

12 min read
5 Steps to THINK in React
Do you think in React?
One of the great things about React is the way it makes you think about apps as you build them. In this article, we'll walk through the 5 step process of building a searchable product data table using React.
This article is based on the React Docs but contains updated code. Instead of using the old way (classes), it uses the new way (hooks).
Start With The Basics
Many times you may get a mock-up from a designer. Then you'll get the JSON API from your back-end developer. Here's what the mock-up looks like:
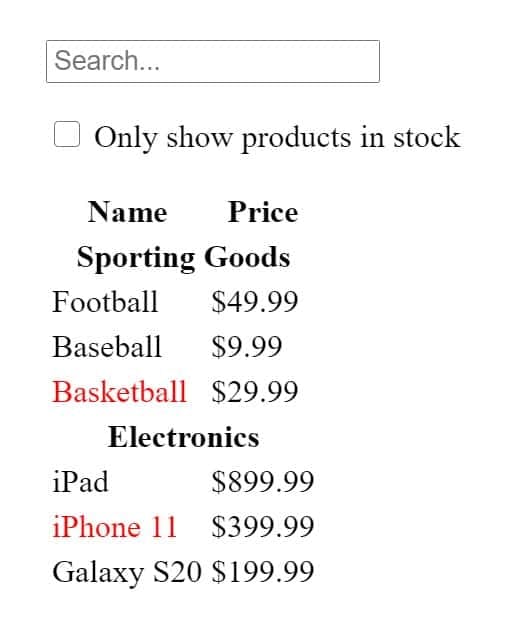
And here's what the JSON data looks like:
const PRODUCTS = [ {category: 'Sporting Goods', price: '$49.99', stocked: true, name: 'Football'}, {category: 'Sporting Goods', price: '$9.99', stocked: true, name: 'Baseball'}, {category: 'Sporting Goods', price: '$29.99', stocked: false, name: 'Basketball'}, {category: 'Electronics', price: '$899.99', stocked: true, name: 'iPad'}, {category: 'Electronics', price: '$399.99', stocked: false, name: 'iPhone 11'}, {category: 'Electronics', price: '$199.99', stocked: true, name: 'Galaxy S20'}];
Step 1: Break The UI Into Components
First, draw boxes around every component and subcomponent in the mock-up and give them all names. The designer may have already completed this for you. The layer names from their design software may end up being the names of your React components!
We need to figure out what should be its own component. The best way to do this is by using a technique called the "Single Responsibility Principle". This basically means that a component should ideally only do one thing. Any time a component grows larger than that, it should be decomposed into smaller subcomponents.
You'll generally be working with JSON data. So separate your UI into components, where each component matches one piece of your data model.
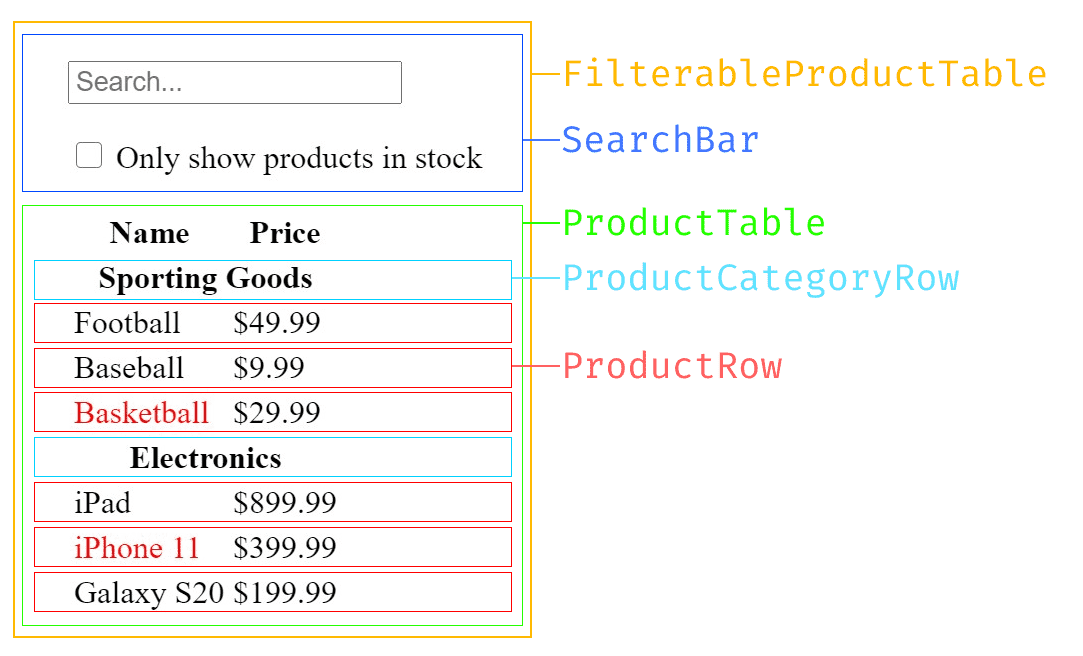
Here we see the mock-up broken down to five components.
FilterableProductTable: Wrapper for the entire app.SearchBar: User input.ProductTable: Displays and filters data based on user input.ProductCategoryRow: Headings for each categoryProductRow: Each product.
Now that we've identified each component, let's arrange them into a hierarchy:
FilterableProductTableSearchBarProductTableProductCategoryRowProductRow
Step 2: Build A Static Version
Now that we have our component hierarchy, it's time to start writing some code. The best and easiest way to get started is to build a version that renders the data and UI but has no interactivity.
We can either start at the top of the hierarchy with FilterableProductTable and work our way down, or start at the bottom with ProductRow and work our way up. With simple apps, it's usually easier to go top-down, but on larger projects, it's easier to go bottom-up and write tests as you build.
We're going to start from the bottom with the ProductRow. So we'll create a functional component which will be passed props. The props will include the product and all of its data. So we'll first get the product. Then we'll get the name, but remember that in our mock-up there were names that were colored red, and this is because these products are not in-stock. So on the product, we will need a stocked property, then we can use a ternary operator to decide whether we need to add custom styling to the name. And finally, we will return a table row with the products name and price.
function ProductRow(props) { const product = props.product; const name = product.stocked ? product.name : <span style={{color: 'red'}}> {product.name} </span>; return ( <tr> <td>{name}</td> <td>{product.price}</td> </tr> );}
Next, we'll build the ProductCategoryRow component. This will also be passed props. The prop that we will need here is the category of the product. Then we will return a table row with the category spanning two columns.
function ProductCategoryRow(props) { const category = props.category; return ( <tr> <th colSpan="2"> {category} </th> </tr> );}
Now for the ProductTable, which will again be passed props, we'll need to keep track of the rows and the last category. We'll loop through each product which is passed from our props and if the product category is not equal to the last products category then we will add a new category row using our ProductCategoryRow component. We'll pass to that component the category and use the category as the key. If the category was already used then this will not be called. Next, we'll push the product to the ProductRow component, passing the product, and using the name as the key. Now we'll set the lastCategory to equal the current products category. Lastly, we will return the table with the rows.
function ProductTable(props) { const rows = []; let lastCategory = null; props.products.forEach((product) => { if (product.category !== lastCategory) { rows.push( <ProductCategoryRow category={product.category} key={product.category} /> ); } rows.push( <ProductRow product={product} key={product.name} /> ); lastCategory = product.category; }); return ( <table> <thead> <tr> <th>Name</th> <th>Price</th> </tr> </thead> <tbody>{rows}</tbody> </table> );}
Next we'll build the SearchBar component. This will return a form with a text input and a checkbox input.
function SearchBar() { return ( <form> <input type="text" placeholder="Search..." /> <p> <input type="checkbox" /> Only show products in stock </p> </form> );}
And finally, we will create the FilterableProductTable component which will simply return the SearchBar and ProductTable components. We'll also pass the products to the ProductTable component.
function FilterableProductTable(props) { return ( <div> <SearchBar /> <ProductTable products={props.products} /> </div> );}
And, of course, we'll render these to the DOM passing our JSON data to the FilterableProductTable component.
ReactDOM.render( <FilterableProductTable products={PRODUCTS} />, document.getElementById('root'));
Now we should see a static representation of the app.
Step 2 Full Code: https://codepen.io/codeSTACKr/pen/QWyvjMW
Step 3: Minimal Representation Of State
To build an app correctly, we need to identify the minimal, complete representation of UI state our app requires. I like to use the "DRY" design principle; Don't Repeat Yourself. If you find yourself typing the same thing multiple times, then there must be a way to combine those. Figure out the absolute minimal representation of the state your application needs and compute everything else you need on-demand.
Here's an example: if you're building a TODO list, keep an array of the TODO items but don't keep a separate state variable for the count. Instead, when you want to render the TODO count, take the length of the TODO items array.
Think about all of the pieces of data we have:
- The original list of products
- The search text the user has entered
- The value of the checkbox
- The filtered list of products
Let's go through each one and figure out which are state. To do this, ask three questions about each piece of data. Answering yes to any of these means that it probably isn't state.
- Is it passed in from a parent via props?
- Does it remain unchanged over time?
- Can you compute it based on any other state or props in your component?
The original list of products is not state since it is passed in as props. The filtered list of products can be computed, so it is not state either. Finally, the search text and the checkbox can be changed and can't be computed from anything, so these are state.
So this is our state that we need to track:
- The search text
- The checkbox value
Step 4: Where Should State Live?
Now, let's identify which component mutates, or owns, our state.
Remember: React uses one-way data flow. It can be difficult to clearly identify which component should own the state. This can be challenging for beginners.
Follow these steps for each piece of state:
- Identify every component that relies on state.
- Find a common parent component.
- If there are no components that make sense, you can create a new component just to keep the state.
Let's run through this for our example:
ProductTableneeds the state in order to filter the product list.SearchBarneeds to display the search text and checked state.- The common component above these is
FilterableProductTable. - So it makes sense for the state to be held in
FilterableProductTable.
Awesome! Now that our state lives in FilterableProductTable, we'll use the useState hook to create filterText and inStockOnly states. Then we'll pass filterText and inStockOnly to ProductTable and SearchBar as props.
function FilterableProductTable(props) { const [filterText, setFilterText] = React.useState(""); const [inStockOnly, setInStockOnly] = React.useState(false); return ( <div> <SearchBar filterText={filterText} inStockOnly={inStockOnly} /> <ProductTable products={props.products} filterText={filterText} inStockOnly={inStockOnly} /> </div> );}
Finally, use these props to filter the rows in ProductTable and set the values of the form fields in SearchBar.
function SearchBar(props) { const filterText = props.filterText; const inStockOnly = props.inStockOnly; return ( <form> <input type="text" placeholder="Search..." value={filterText} /> <p> <input type="checkbox" checked={inStockOnly} /> {' '} Only show products in stock </p> </form> );}
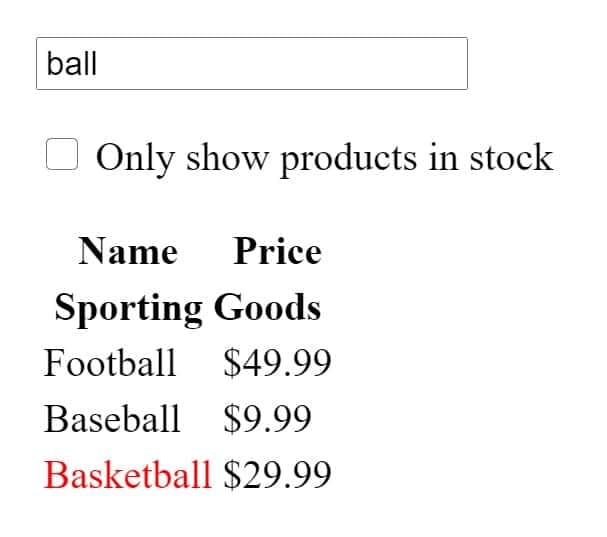
Now we have an idea of how this example should work. We could set filterText to "ball" in our FilterableProductTable component state and refresh the app. The table should show the updated list of products.
Step 4 Full Code: https://codepen.io/codeSTACKr/pen/PoZmPRg
Step 5: Add Inverse Data Flow
Our app now works by passing probs and state down to the necessary components. Now we need to allow data to flow back up from these components to the state.
If you try to type in the input or check the box, nothing happens. That is by design. We have set the value prop of the input to be equal to the state passed in from FilterableProductTable.
So, we need to enable the user to make changes to the form. These changes need to update our state. So we'll need to pass the useState hooks setter function to SearchBar that will fire whenever the state should be updated.
function FilterableProductTable(props) { const [filterText, setFilterText] = React.useState(""); const [inStockOnly, setInStockOnly] = React.useState(false); return ( <div> <SearchBar filterText={filterText} inStockOnly={inStockOnly} onFilterTextChange={text => setFilterText(text)} onInStockChange={stock => setInStockOnly(stock)} /> <ProductTable products={props.products} filterText={filterText} inStockOnly={inStockOnly} /> </div> );}
We can use onChange on the inputs to be notified of the change. The states setter function, passed by FilterableProductTable will update the app.
function SearchBar(props) { const filterText = props.filterText; const inStockOnly = props.inStockOnly; return ( <form> <input type="text" placeholder="Search..." value={filterText} onChange={e => props.onFilterTextChange(e.target.value)} /> <p> <input type="checkbox" checked={inStockOnly} onChange={e => props.onInStockChange(e.target.checked)} /> {' '} Only show products in stock </p> </form> );}
Step 5 Full Code: https://codepen.io/codeSTACKr/pen/mdVmezo
Bonus
As a bonus, we are going to style this application using Tailwind CSS. Now, I'm not going to get into all of the details of Tailwind, but you can take a look at the documentation which is very detailed. Basically Tailwind is A utility-first CSS framework. It is low-level and provides all of the basic building blocks. We can simply add predefined classes to our markup and not have to write a single line of CSS.
Let's start in our FilterableProductTable component. On the main div we'll add the classes: flex flex-col pt-10 items-center min-h-screen w-full bg-gray-900 text-white. Then on our h1 we'll add the classes: text-3xl font-bold mb-5.
function FilterableProductTable(props) { const [filterText, setFilterText] = React.useState(""); const [inStockOnly, setInStockOnly] = React.useState(false); return ( <div className="flex flex-col pt-10 items-center min-h-screen w-full bg-gray-900 text-white"> <h1 className="text-3xl font-bold mb-5">Products</h1> <SearchBar filterText={filterText} inStockOnly={inStockOnly} onFilterTextChange={text => setFilterText(text)} onInStockChange={stock => setInStockOnly(stock)} /> <ProductTable products={props.products} filterText={filterText} inStockOnly={inStockOnly} /> </div> );}
Now for the SearchBar component, we'll add these classes to the text input: shadow appearance-none border-none rounded w-full py-2 px-3 mb-4 bg-gray-700 leading-tight focus:outline-none focus:shadow-outline. For the checkbox input we'll add: mr-2 leading-tight. And lastly, we'll wrap the checkbox text in a span with the class of text-sm.
function SearchBar(props) { const filterText = props.filterText; const inStockOnly = props.inStockOnly; return ( <form> <input type="text" placeholder="Search..." value={filterText} onChange={e => props.onFilterTextChange(e.target.value)} className="shadow appearance-none border-none rounded w-full py-2 px-3 mb-4 bg-gray-700 leading-tight focus:outline-none focus:shadow-outline" /> <p> <input type="checkbox" checked={inStockOnly} onChange={e => props.onInStockChange(e.target.checked)} className="mr-2 leading-tight" /> <span class="text-sm"> Only show products in stock </span> </p> </form> );}
Next, the ProductTable component table will get these classes: table-fixed lg:w-1/3 md:w-1/3 sm:w-1/2 my-5. The table rows will get: border-b border-t border-gray-700. The name column will get these classes: w-1/2 px-4 py-2 text-left. Then the price column will be very similar, only changing the text alignment: w-1/2 px-4 py-2 text-right.
function ProductTable(props) { const filterText = props.filterText; const inStockOnly = props.inStockOnly; const rows = []; let lastCategory = null; props.products.forEach((product) => { if (product.name.indexOf(filterText) === -1) { return; } if (inStockOnly && !product.stocked) { return; } if (product.category !== lastCategory) { rows.push( <ProductCategoryRow category={product.category} key={product.category} /> ); } rows.push( <ProductRow product={product} key={product.name} /> ); lastCategory = product.category; }); return ( <table className="table-fixed lg:w-1/3 md:w-1/3 sm:w-1/2 my-5"> <thead> <tr className="border-b border-t border-gray-700"> <th className="w-1/2 px-4 py-2 text-left">Name</th> <th className="w-1/2 px-4 py-2 text-right">Price</th> </tr> </thead> <tbody>{rows}</tbody> </table> );}
Now for the ProductCategoryRow component. We'll add these classes to the table header: text-orange-600 bg-gray-800 border-b border-gray-700 py-2.
function ProductCategoryRow(props) { const category = props.category; return ( <tr> <th colSpan="2" className="text-orange-600 bg-gray-800 border-b border-gray-700 py-2"> {category} </th> </tr> );}
And lastly, the ProductRow components table row will get: border-b border-gray-700. The name column will get: p-1. And the price column will get: p-1 text-right.
function ProductRow(props) { const product = props.product; const name = product.stocked ? product.name : <span className="text-red-600"> {product.name} </span>; return ( <tr className="border-b border-gray-700"> <td className="p-1">{name}</td> <td className="p-1 text-right">{product.price}</td> </tr> );}
Tailwind CSS Styled Code: https://codepen.io/codeSTACKr/pen/oNbWbNQ
Conclusion
React is very powerful and can be easy to write when you "Think" in React. Adding Tailwind CSS to React makes adding CSS styling simple and super easy!
Let me know what you think.
Check out the full video on my YouTube channel.
Help me out by liking this video and subscribing if you haven't already.